Archive
RSpec Reporting Tool
Reports play a vital role in software testing. It provides results and more information which is the basis of our analysis and recommendations as software quality assurance.
Rspec gem provides an easy way of generating a report in our Selenium tests. Here are important things to remember:
1. Include the following commands in your spec file.
2. Create a method in your session that will rename your selenium driver instance to “selenium_driver”. (See lines 22-24)
3. Run your spec in two ways:
Option 1: From the console, go to your spec folder and manually type below command right after you invoked “spec <spec_filename>.rb”
e.g. spec user_spec.rb –require ‘rubygems,selenium/rspec/reporting/selenium_test_report_formatter’ –format=Selenium::RSpec::SeleniumTestReportFormatter:./reports/tests_report.html
where “user_spec.rb” is your spec filename
Option 2: Create a rake file and require Rspec report formatter options, like the one below
From the console,
– go to the folder where you saved your rake file
– type rake -T or rake –tasks (this will display all the available tasks defined in your rakefile)
– invoked the task that will run your spec file by typing rake <task_name>, in my case ->> rake run:spec
Hint hint hint: Preferably intall ruby gem syntax to properly highlight the codes prior to running your tests.
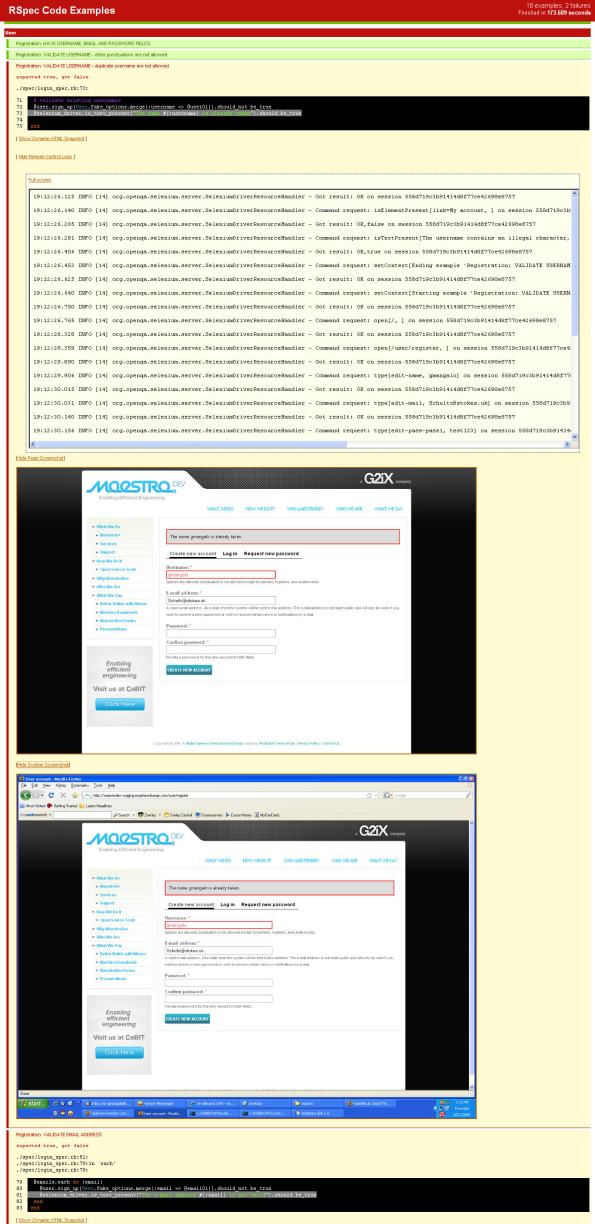
And whalla! This setup will automatically generate an html report just like this everytime you run your spec files:
Running my Testlink Selenium scripts in IRB
Here’s a simple documentation on how I execute my Testlink scripts via IRB:
1. Install the following in my local box:
- Ruby and RubyGems
- XAMPP
- Testlink
2. Created the following ruby files located in the specified folder
..\project_folder\lib\testlink.rb –> An instance of selenium client driver for Testlink session
..\project_folder\lib\user.rb –> User class where methods pertaining to user is defined
..\project_folder\rakefile.rb –> File containing my rake tasks
3. Go To XAMPP Control Panel, start Apache and MySql services
4. Launch Console and do the following
go to distribution file (d:\qa-training\gmangalo\lib)
run rake tasks (type rake –tasks OR rake -T)
start your server (type selenium:rc:start)
load your irb (type irb)
require your file (type require ‘user’)
create an instance of your session (type session_name = Session_class.new)
e.g. session = Testlink.new
create an instance of your user passing the created session (type user_name = User_class.new(session_name))
e.g. user = User.new(session)
start your session (type session_name.start)
e.g. session.start
go to URL’s login page (type session_name.open “URL PAGE”)
e.g. session.open “/testlink/login.php”
At this point I can now play around with the application via console using the methods defined.
Favicon tricks in WordPress and Blogger/Blogspot
WordPress
If you’re using a free account in WordPress, here’s a two-step trick to add favicon on your WordPress blog.
No need to upload, generate favicon file, download and edit header HTML. Just follow these easy steps:
1. First, you need an image. Personalized it, probably this would eat most of your time than actual setting it as your favicon 🙂
2. Go to Dashboard, select General > Settings. Under Blog Picture, upload the image you want to set as your favicon then SAVE changes.
Whalla!!! You have now an instant favicon in your WordPress 🙂
Blogger/Blogspot
For Blogspot users, we are lucky to have access on the HTML settings of our blog.
1. Again you also need a copy of the image in JPG format.
2. Go to Favicon Generator, select the desired image to upload and click ” Create Favicon.”
3. Right click on the generated icon and save image as PNG in your desired location.
4. Login to your Blogspot account, create a new post and upload your favicon as an image. With this, Blogger hosts the image and allocates a URL for the uploaded PNG. You need to save this post as draft but not necessarily publish it, only for your icon to be hosted. From the post, copy the image URL as highlighted below.
![]()
5. In your Dashboard, go to Layout > Edit HTML. In between<head> and</head> tags, paste the following codes:
<link href='favicon URL source' rel='shortcut icon'/>
6. Edit href by replacing the image URL you copied from your post. This time it should look like this:
<link href='http://1.bp.blogspot.com/_9gl9ClBHvEY/ShPe06TcbSI/AAAAAAAAARs/
6UQNJlXNIT8/s320/g.png' rel='shortcut icon'/>
7. Save your template. And now you can view your favicon in your Blogger page.
Simply amazing =) I enjoyed setting it both in my WordPress and Blogspot pages.


Recent Comments